I received a lot of e-mail responses to my last post regarding the process of converting fiber to yarn. Lots of you want pictures! Do I detect many knitters on the brink of making a crossover? (Just remember, spindles are a cheap way to test the waters)(without causing marital problems) The art of spinning is something I am unqualified to present to you on any formal level, but I thought I'd do what I could and give you a visual journey through my own spinning process. This topic will span 2 to 3 posts, not only because I am wary of overwhelming non-spinners with too much foreign information, but because currently my personal spinning time is a rarity, and this current spinning project is literally in progress. I think it works best this way for all of us. Now, shall we begin?
Wool comes to handspinners in many different forms. In our case we'll be looking at hand-dyed roving, which seems to me one of the more popular ways urban spinners (with no space for cleaning or carding fleeces) like to roll.

A roving is a continuous strip of combed or carded fibers to which a slight twist has been added (to keep everything everything together for dying, shipping, etc). Basically, a long, doughy strip of compressed wool. Rovings often come in braids after they've been dyed, like the one shown above. This particular beauty comes to us from the good folks at Interlacements in Colorado.
Unfurl the braid to see the roving in its entirety. The photo below shows the roving unbraided and reveals the dying scheme - spacial color fields of oranges, blues, and greens. Purdy, ain't it?

Roving is too dense to spin as-is and must be drafted first. Some spinners draft as they spin, others, like me, prefer pre-drafting. Drafting is essentially drawing the fibers out gently from one another to allow air into the spaces between individual fibers. When wool is drafted well it flows easily and consistently while spinning, which is desirable if you like your yarn nice and even. Notice below the difference in the fiber between my fingers and those that have yet to be drawn out. Wispy!

In the wrong mindset, drafting can be an annoying precursor to the good stuff, although I tend to enjoy it - preparing the fiber and getting to know the tactile qualities of your specific batch of wool adds a special layer to the process. Kind of like giving your fiber a massage.
Depending on what color-effects you're after, you may choose to tear the roving into strips and draft them individually. By doing this you essentially reduce the length of color repeats in your yarn - a quality you can manipulate in order to conjure up self-striping color patterns or other color tricks in your final yarn. With a well-dyed roving, you have a whole lot of possibilities - no two yarns will ever be exactly the same.
Below is a strip of roving (this time around, I split mine into 4) balled up on the window before being drafted.

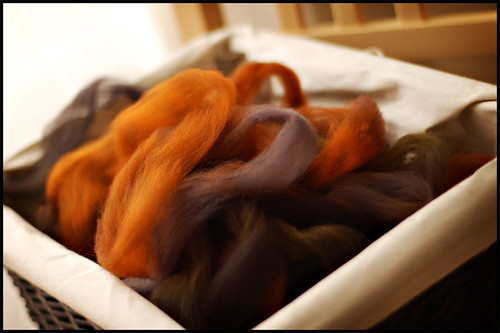
Drafting magically makes your fiber amount seem to multiply exponentially - what used to slink easily into the bottom of your basket as a tidy little roving now gently floats up over the edges - a sumptuous cloud of colorful wool bursting with potential, just waiting for a romp with your wheel. A rather delicate thing of beauty in itself (Note: not pet friendly, nor wind friendly for that matter).

A nice big basket of pre-drafted fiber is a great thing to have around (see above if you own pets) - beautiful on its own, but always ready for a quick spin. And with this full basket, we conclude this evening's portion of our tour - fiber prep.
Up next we get down-n-dirty making yarn, followed by some form of knitting-with-handspun, although I'm not promising any projects... if I did, I may never get around to that third post! Stay tuned for more spinning fun!


